3. Implement Azure security (20-25%)
3.1 Implement user authentication and authorization
authenticate and authorize users by using the Microsoft Identity platform + Azure Active Directory
- Goals:
- sign in users to web applications and provide authorized access to protected web APIs
- protect a web API by requiring an access token to perform API operations
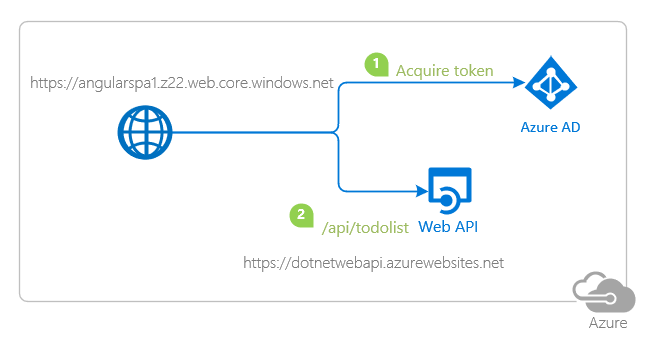
- Implementations (MSAL Angular, sample repo):
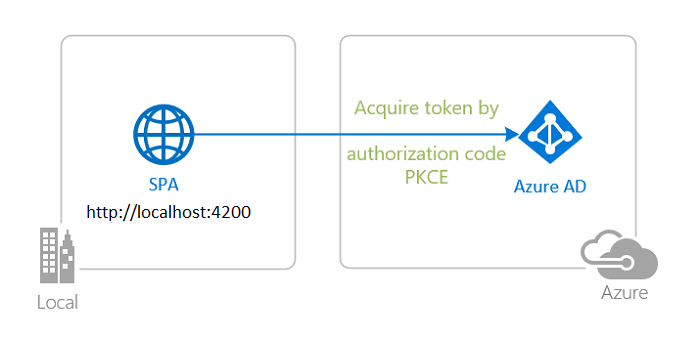
- Sign-in a user to your application (Azure AD)
- Azure Portal > Azure AD > App registrations > Register new app > enter name
- copy application (client) ID
- copy directory (tenant) ID
- configuration
const msalConfig = { auth: { clientId: "<YOUR_CLIENT_ID>", authority: "https://login.microsoftonline.com/common", // allows sign-ins with any type of account redirectUri: "<YOUR_REDIRECT_URI>", }, - sign-in
- login method ```js export function MSALGuardConfigFactory(): MsalGuardConfiguration { return { interactionType: InteractionType.Redirect, }; }
export class AppComponent implements OnInit {
  constructor(
      @Inject(MSAL_GUARD_CONFIG) private msalGuardConfig: MsalGuardConfiguration,
      private authService: MsalService,
      private msalBroadcastService: MsalBroadcastService
  ) {}

  ngOnInit(): void {

  login() {
      if (this.msalGuardConfig.interactionType === InteractionType.Popup) {
          if (this.msalGuardConfig.authRequest) {
              this.authService.loginPopup({...this.msalGuardConfig.authRequest} as PopupRequest)
              .subscribe((response: AuthenticationResult) => {
                  this.authService.instance.setActiveAccount(response.account);
              });
              } else {
              this.authService.loginPopup()
                  .subscribe((response: AuthenticationResult) => {
                  this.authService.instance.setActiveAccount(response.account);
                  });
          }
      } else {
          if (this.msalGuardConfig.authRequest) {
              this.authService.loginRedirect({...this.msalGuardConfig.authRequest} as RedirectRequest);
          } else {
              this.authService.loginRedirect();
          }
      }
  }   }   ```   - Single sign-on   ```js   export class AppComponent implements OnInit {
  constructor(
      private authService: MsalService,
  ) {}

  ngOnInit(): void {
      const silentRequest: SsoSilentRequest = {
          scopes: ["User.Read"],
          loginHint: "user@contoso.com"
      }

      this.authService.ssoSilent(silentRequest)
      .subscribe({
          next: (result: AuthenticationResult) => {
              console.log("SsoSilent succeeded!");
          },
          error: (error) => {
              this.authService.loginRedirect();
          }
      });
  }   }   ```   - login event callback   ```js   export class HomeComponent implements OnInit {

  private readonly _destroying$ = new Subject<void>();

  constructor(private authService: MsalService, private msalBroadcastService: MsalBroadcastService) { }

  ngOnInit(): void {
      this.msalBroadcastService.msalSubject$
      .pipe(
          filter((msg: EventMessage) => msg.eventType === EventType.LOGIN_SUCCESS),
          takeUntil(this._destroying$)
      )
      .subscribe((result: EventMessage) => {
          // do something with the result, such as accessing ID token
      });
  }

  ngOnDestroy(): void {
      this._destroying$.next(undefined);
      this._destroying$.complete();
  }   }   ```   - securing routes   ```js   const routes: Routes = [
  {
      path: 'guarded',
      component: GuardedComponent,
      canActivate: [
          MsalGuard
      ]
  }   ]   ```
- Sign-in a user and get an Access Token for Microsoft Graph to protect resources and scopes
- Microsoft Graph API:
- offers a single endpoint to provide access to rich, people-centric data and insights in the Microsoft cloud
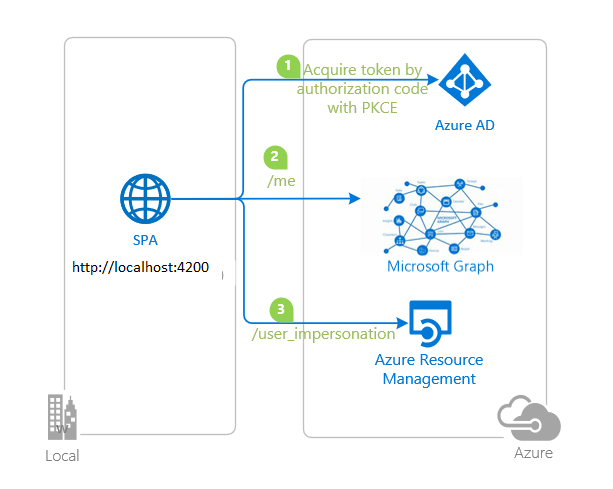
- Configure API permissions
- Azure Portal > Azure AD > App registrations > select app > Manage > API permissions
- Add a permission > Microsoft APIs > Microsoft Graph
- delegate Permissions > Add permissions
User.Read
- delegate Permissions > Add permissions
- Add a permission > Microsoft APIs > Azure Service Management
- delegate Permissions > Add permissions
user_impersonation
- delegate Permissions > Add permissions
- Add a permission > Microsoft APIs > Microsoft Graph
- Azure Portal > Azure AD > App registrations > select app > Manage > API permissions
- Acquire a token
export class AppComponent implements OnInit { constructor( private authService: MsalService, ) {} ngOnInit(): void { this.authService.acquireTokenSilent({ account: this.authService.getActiveAccount(), // get the current user's account scopes: ["User.Read"] }).subscribe({ next: (result: AuthenticationResult) => { console.log(result); }, error: (error) => { this.authService.acquireTokenRedirect({ scopes: ["User.Read"] }); } }); } } - Working with multiple resources.
```js
// “User.Read” stands as shorthand for “graph.microsoft.com/User.Read”
const graphToken = await msalInstance.acquireTokenSilent({
scopes: [ “User.Read” ]
});
const customApiToken = await msalInstance.acquireTokenSilent({
scopes: [ “api://
/My.Scope" ] });
  - Calling Microsoft Graph API
  ```js
  export class GraphService {
      constructor(private authService: MsalService) { }

      getGraphClient = (providerOptions: ProviderOptions) => {

          /**
          * Pass the instance as authProvider in ClientOptions to instantiate the Client which will create and set the default middleware chain.
          * For more information, visit: https://github.com/microsoftgraph/msgraph-sdk-javascript/blob/dev/docs/CreatingClientInstance.md
          */
          let clientOptions = {
              authProvider: new MyAuthenticationProvider(providerOptions, this.authService),
          };

          const graphClient = Client.initWithMiddleware(clientOptions);

          return graphClient;
      }
  }
class MyAuthenticationProvider implements AuthenticationProvider { account; scopes; interactionType; constructor(providerOptions: ProviderOptions, private authService: MsalService) { this.account = providerOptions.account; this.scopes = providerOptions.scopes; this.interactionType = providerOptions.interactionType; } /** * This method will get called before every request to the ms graph server * This should return a Promise that resolves to an accessToken (in case of success) or rejects with error (in case of failure) * Basically this method will contain the implementation for getting and refreshing accessTokens */ getAccessToken(): Promise<string> { return new Promise(async (resolve, reject) => { let response: AuthenticationResult; try { response = await this.authService.instance.acquireTokenSilent({ account: this.account, scopes: this.scopes }); if (response.accessToken) { resolve(response.accessToken); } else { reject(Error('Failed to acquire an access token')); } } catch (error) { // in case if silent token acquisition fails, fallback to an interactive method if (error instanceof InteractionRequiredAuthError) { switch (this.interactionType) { case InteractionType.Popup: response = await this.authService.instance.acquireTokenPopup({ scopes: this.scopes }); if (response.accessToken) { resolve(response.accessToken); } else { reject(Error('Failed to acquire an access token')); } break; case InteractionType.Redirect: this.authService.instance.acquireTokenRedirect({ scopes: this.scopes }); break; default: break; } } } }); } }const providerOptions: ProviderOptions = { account: this.authService.instance.getActiveAccount()!, scopes: protectedResources.graphMe.scopes, interactionType: InteractionType.Popup };this.graphService.getGraphClient(providerOptions) .api('/me').get() .then((profileResponse: ProfileType) => { // do something with response }) .catch((error) => { // handle errors }); - Microsoft Graph API:
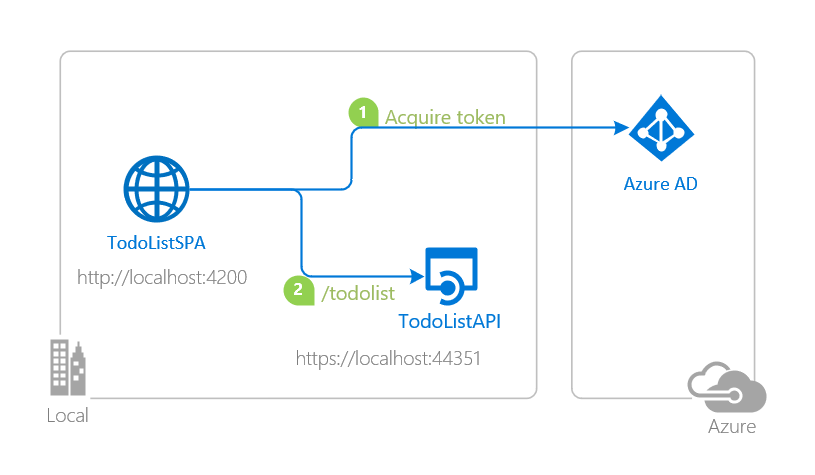
- Protect an API and call the (ASP.NETCore) API from your client app
- Register new API application in Azure (see above)
- Name:
msal-dotnet-api - Expose the API: Azure Portal > Azure AD > Manage > Expose an API > click “Set”
- Application ID URI generated, format:
api://{clientId} - Add a scope
- Scope name:
access_as_user - Consent: “Admins and users”
- Admin consent display name: “Access msal-dotnet-api”
- Admin consent description: “Allows the app to access msal-dotnet-api as the signed-in user.”
- User consent display name: “Access msal-dotnet-api”
- User consent description: “Allow the application to access msal-dotnet-api on your behalf.”
- State: “Enabled”
- click “Add scope”
- Scope name:
- Application ID URI generated, format:
- Configure API permissions
- Azure Portal > Azure AD > App registrations > select API app > Manage > Manifest
- set
accessTokenAcceptedVersionto2 - click “Save”
- set
- Azure Portal > Azure AD > App registrations > select API app > Manage > Manifest
- Configure the API app to use the API app registration
API/appsettings.json- Domain: Azure AD tenant name
- ClientId: application ID (clientId) of
msal-dotnet-api - TenantId : Azure AD tenant ID
API/Controllers/TodoListController.csscopeRequiredByApi: exposed API scope:access_as_user
- Name:
- Register new SPA application in Azure (see above)
- Set permissions for access to the
msal-dotnet-apiAPI- Azure Portal > Azure AD > App registrations > select SPA app > Manage
- API permissions > My APIs > select
msal-dotnet-api- Select permissions
access_as_user- click “Add permissions”
- Select permissions
- API permissions > My APIs > select
- Configure the SPA app to use the SPA app registration
- ClientId: application ID (clientId) of
msal-dotnet-spa - TenantId : Azure AD tenant ID
- Web API scope:
api://{clientId_of_service_app}/access_as_user
- ClientId: application ID (clientId) of
- Azure Portal > Azure AD > App registrations > select SPA app > Manage
- Set permissions for access to the
- Access token validation in API
public void ConfigureServices(IServiceCollection services) { // Setting configuration for protected web api services.AddAuthentication(JwtBearerDefaults.AuthenticationScheme) .AddMicrosoftIdentityWebApi(Configuration); // Creating policies that wraps the authorization requirements services.AddAuthorization(); }[Authorize] [Route("api/[controller]")] [ApiController] public class TodoListController : ControllerBase { // The Web API will only accept tokens 1) for users, and // 2) having the access_as_user scope for this API static readonly string[] scopeRequiredByApi = new string[] { "access_as_user" }; private readonly TodoContext _context; public TodoListController(TodoContext context) { _context = context; } // GET: api/TodoItems [HttpGet] public async Task<ActionResult<IEnumerable<TodoItem>>> GetTodoItems() { HttpContext.VerifyUserHasAnyAcceptedScope(scopeRequiredByApi); string owner = User.FindFirst(ClaimTypes.NameIdentifier)?.Value; return await _context.TodoItems.Where(item => item.Owner == owner).ToListAsync(); } // ... } - CORS configuration to be able to call the API (here: allow any)
  services.AddCors(o => o.AddPolicy("default", builder =>
  {
  builder.AllowAnyOrigin()
         .AllowAnyMethod()
         .AllowAnyHeader();
  }));
- Deploy your applications to Azure
- Registration (see above)
- Register service app (.NETCore web API)
- Register client app (Angular SPA)
- Deployment to Azure App Service (API)
- Publish files (VSCode/VS)
dotnet publish --configuration release- published folder:
bin/Release/<FolderName>- right click: “Deploy to Web App”
- “Create New Web App” > Windows
- Disable Azure App Services default authentication
- Azure Portal > Azure App Services > select Project > Settings > Authentication/Authorization: set “App Service Authentication” to “Off”
- Enable CORS
- Azure Portal > Azure App Services > select Project > API > CORS
- check box “Enable Access-Control-Allow-Credentials”
- Allowed origins: add URI of published website
- Azure Portal > Azure App Services > select Project > API > CORS
- Publish files (VSCode/VS)
- Deployment to Azure Storage (SPA)
- Create an Azure Storage blob and obtain website URI
- Build your project and upload it to Azure Storage blob
ng build --prod
- Update config files with website callback URI
- Control access to your protected API using App Roles and Security Groups
- App Roles
- Register API service app, add scope (see above)
- Register SPA service app
- Define application roles
- Azure Portal > Azure Active Directory > App Registrations > select API app
- App roles > Create app role: enter Display Name, Allowed member type (users/groups), Value, Description > Apply
- Azure Portal > Azure Active Directory > App Registrations > select API app
- Assign users and groups to app roles
- Azure Portal > Azure Active Directory > Enterprise Applications
- Manage > All applications > select API app
- Manage > Users and groups > Add user/groups > Add Assignment panel
- Select user
- Select role
- “Assign”
- Configure API service app and SPA service app to use the app registrations (see above)
- Security Groups
- App Roles
- Develop and provision a multi-tenant SaaS application
- Advanced scenarios
- Sign-in a user to your application (Azure AD)
create and implement shared access signatures
- Shared access signature (SAS): secure delegated access to resources in your storage account
- granular control over how a client can access your data

- Types
- User delegation SAS
- secured with Azure Active Directory (Azure AD) credentials
- specify permissions for the SAS
- applies to Blob storage only
- Service SAS
- secured with storage account key
- delegates access to a resource in one of the Azure Storage services: Blob storage, Queue storage, Table storage, Azure Files
- Account SAS
- secured with storage account key
- delegates access to resources in one or more of the storage services
- all of the operations available via a service or user delegation SAS are also available via an account SAS
- User delegation SAS
- Create a user delegation SAS for a container or blob
- Assign permissions with Azure RBAC
New-AzRoleAssignment -SignInName <email> ` -RoleDefinitionName "Storage Blob Data Contributor" ` -Scope "/subscriptions/<subscription>/resourceGroups/<resource-group>/providers/Microsoft.Storage/storageAccounts/<storage-account>" - Use Azure AD credentials to secure a SAS:
-UseConnectedAccount$ctx = New-AzStorageContext -StorageAccountName <storage-account> -UseConnectedAccount - Create a user delegation SAS for a container
  New-AzStorageContainerSASToken
  -Context $ctx `
  -Name <container> `
  -Permission racwdl `
  -ExpiryTime <date-time>
- Assign permissions with Azure RBAC
3.2 Implement secure cloud solutions
secure app configuration data by using App Configuration and Azure Key Vault
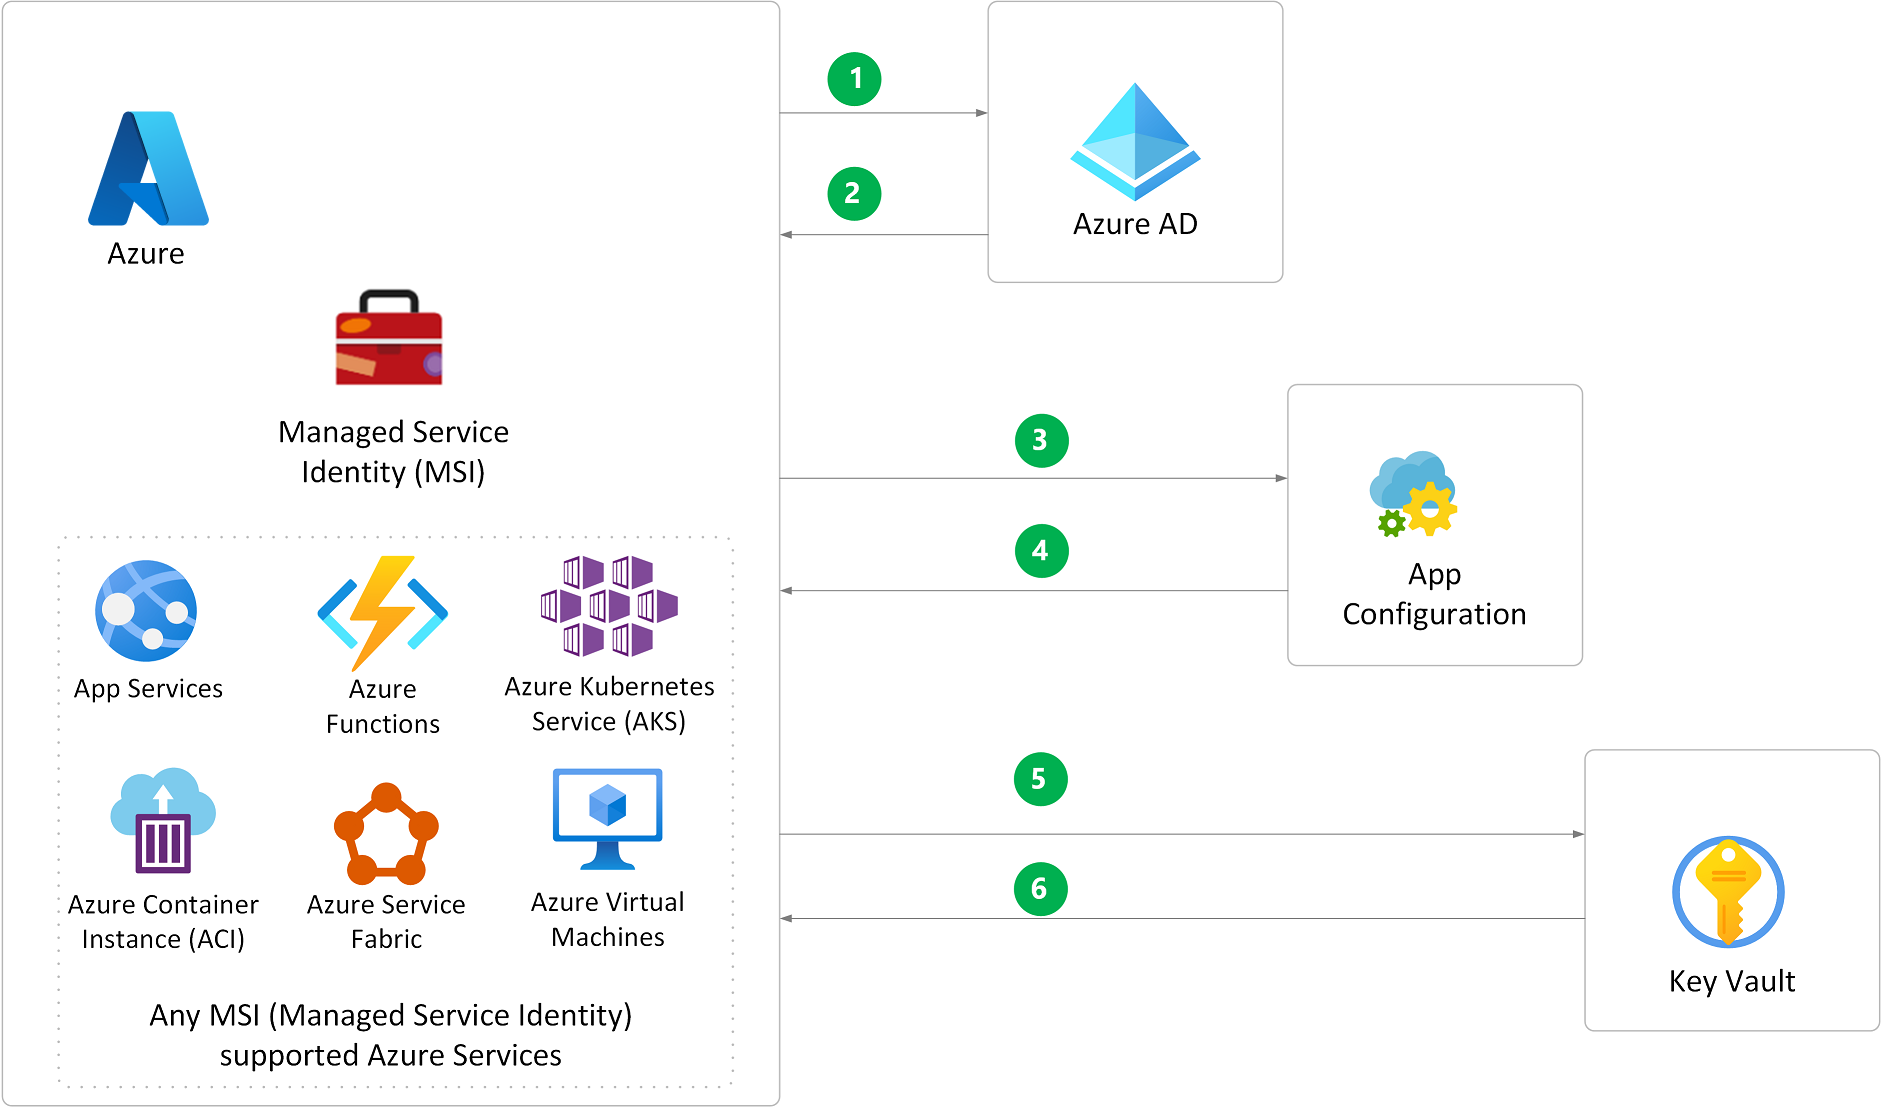
- The application sends an authentication request during debugging in Visual Studio, or authenticates via the MSI (Managed Service Identity) in Azure.
- Upon successful authentication, Azure AD returns an access token.
- The App Configuration SDK sends a request with the access token to read the app’s App Configuration KeyVault secretURI value for the app’s key vault.
- Upon successful authorization, App Configuration sends the configuration value.
- Using the sign-in identity, the app sends a request to Azure Key Vault to retrieve the application secret for the secretURI that App Configuration sent.
- Upon successful authorization, Key Vault returns the secret value.
- use a different key vault for each application in each environment
- helps prevent sharing secrets across environments, and reduces the threat in case of a breach
- the sign-in identity must have the App Configuration Data Reader role in the App Configuration resource, and have explicit access policies for retrieving the secrets in Azure Key Vault
develop code that uses keys, secrets, and certificates stored in Azure Key Vault
- local development: Secret Manager
- App project file:
<PropertyGroup> <UserSecretsId>{GUID}</UserSecretsId> </PropertyGroup> - Set secrets:
dotnet user-secrets set "{SECRET NAME}" "{SECRET VALUE}"
- App project file:
- production environment: Azure Key Vault
- Authenticate and create a client
var keyVaultName = Environment.GetEnvironmentVariable("KEY_VAULT_NAME"); var kvUri = "https://" + keyVaultName + ".vault.azure.net"; var client = new KeyClient(new Uri(kvUri), new DefaultAzureCredential()); var client = new SecretClient(new Uri(kvUri), new DefaultAzureCredential()); var client = new CertificateClient(new Uri(kvUri), new DefaultAzureCredential()); - Keys
- Save a key
var key = await client.CreateKeyAsync("myKey", KeyType.Rsa); - Retrieve a key
var key = await client.GetKeyAsync("myKey"); - Delete a key
  var operation = await client.StartDeleteKeyAsync("myKey");

  // You only need to wait for completion if you want to purge or recover the key.
  await operation.WaitForCompletionAsync();

  var key = operation.Value;
  await client.PurgeDeletedKeyAsync("myKey");
- Save a key
- Secrets
- Save a secret
await client.SetSecretAsync(secretName, secretValue); - Retrieve a secret
var secret = await client.GetSecretAsync(secretName); - Delete a secret
  var operation = await client.StartDeleteSecretAsync("mySecret");
  // You only need to wait for completion if you want to purge or recover the key.
  await operation.WaitForCompletionAsync();

  await client.PurgeDeletedKeyAsync("mySecret");
- Save a secret
- Certificates
- Save a certificate (self-signed certificate with default issuance policy)
var operation = await client.StartCreateCertificateAsync("myCertificate", CertificatePolicy.Default); var certificate = await operation.WaitForCompletionAsync(); - Retrieve a certificate
var certificate = await client.GetCertificateAsync("myCertificate"); - Delete a certificate
  var operation = await client.StartDeleteCertificateAsync("myCertificate");

  // You only need to wait for completion if you want to purge or recover the certificate.
  await operation.WaitForCompletionAsync();

  var certificate = operation.Value;
  await client.PurgeDeletedCertificateAsync("myCertificate");
- Save a certificate (self-signed certificate with default issuance policy)
- Authenticate and create a client
- Non-Azure-hosted apps: Use Application ID and X.509 certificate
- Azure-hosted apps: use Managed identities for Azure resources
implement solutions that interact with Microsoft Graph
 See 3.1